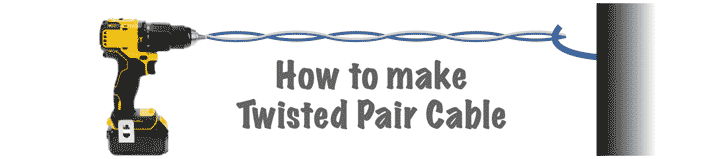
How to Make Twisted Pair Cable - it's very easy
Find out about an easy technique for making twisted pair cable for next to no cost to be used in many areas within electronics equipment and on the bench
Home » Construction & manufacture » this page
Construction Hints & Tips Includes:
Practical hints & tips overview
How to make twisted pair wire
How to drill cases that are painted
How to use heat shrink sleeving
How to tidy wiring with looms
How to straighten kinked connecting wire
Bending & forming axial component leads
Using ferrite rings to cure power line interference
Twisted wire pairs or twisted cable as it is sometimes called has many uses within electronics and it can be seen in many areas of electronics from free running cables to use within electronic equipment.
Twisted wire cable is used in many areas as it offers several advantages in terms of its electrical parameters as well as having other practical advantages,
Advantages of twisted pair cable
Twisted pair wires and twisted pair cable is used in a number of areas and for a number of reasons.
Some of the advantages include some of the following reasons.
Keeps wires tidy: Although, possibly not the most technical reason, it is nevertheless important in many instances to keep wires tidy. It can be more convenient to twist wires voltage or power supply wires as this can keep them neatly routed within an equipment. Also when using cables from a power supply to power a project or circuit being developed, it can be very convenient and very much tidier to have the power cables twisted together to prevent them being tangled an getting in the way of more important items.
Reduces radiation and pick-up: By twisting wires together, the electric and magnetic fields from them will cancel, assuming they are signal and return. The currents will be equal and opposite in magnitude but flowing in opposite directions. This means that the electric and magnetic fields will be opposing. Although it is not as effective as screened cable, it provides a very good way of reducing stray radiation and pickup. It is interesting to note that the wire pairs for signals in an Ethernet cable are twisted together. For the higher quality
In cables like Ethernet cables, screening can also be used. If the cable has no screening it may be designated as unshielded twisted pair, or UTP. The cables that are not shielded will have the letters, UTP as part of their specification.
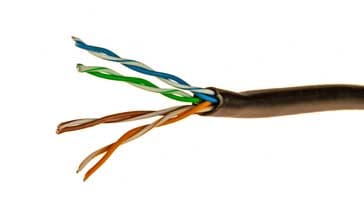
To provide further immunity against radiation and pickup some cables may have shielded twisted pairs. Cables that use this shielding will have the designation STP for shielded twisted pair in the specification.
How to make twisted pair cable
Although it is possible to buy twisted pair cable, it is also very easy to make. Often only short lengths are needed, so it saves buying a whole reel of twisted pair cable when only a short length is needed.
It is really easy to make very professional looking twisted pair cable. There are a few simple steps that are needed, along with the wire, an anchor point which could be a hook or a vice on a bench, and a drill, preferably an electric one with speed control, or a hand drill.
Video: How to make twisted pair cable
The tools, anchor points and the like are basically based around what is available. Nothing is aprticaulrly critical and with a little ingenuity, it should be possible to set this up in almsot any situation.
There are several simple stages:
1 Cut the wire to length
The first stage is to cut the wire to length. Make the wires exactly the same length.
A bit extra will be needed at either end, and it is also worth having a small allowance because twisting the wires together will result in a small reduction on the cable length when compared to the original wire lengths. It is also worth making the wires a bit longer than you need because it is easy to underestimate the length needed for a particular run, and you don't want to repeat it to get the right length.
2 Put a knot in both ends
Keeping the wire ends together, knot the ends together. This serves several purposes. It enables one end to be put over a hook, or more easily placed firmly in a vice. It keeps the wires in place together, and it enables the wires to be held more easily in the chuck of the drill.
3 Secure both ends
Place the remote end of the wires to be twisted together in a vice or place it over a suitable hook, and then place the other end in the chuck of the drill to be used.
4 Start to twist the wires together
With the wire under moderate tension to keep the wires taut, the drill can be turned. It is best to do this steadily and not too fast to prevent any knots and kinks appearing.
The wires should be twisted a little beyond the twist that is required because it will relax a little after the

However it is necessary to keep the wire under reasonably tension - this helps prevent kinks from appearing as the wire is twisted more tightly.
5 Let cable 'relax'
As the twisting tension is removed from the twisted pair cable, it will be found that it relaxes a little.
Ensure there is sufficient twist in the cable to keep the wires closely twisted together and prevents them from falling apart.
The cable should look professional. It should be evenly twisted and not have any kinks in it. The overall job should look good.
6 Remove the wire
The final stage of preparing the twisted pair cable is to use it. Obviously the knotted ends should be cut off, and then the twisted pair cable can be measured and installed in the equipment, or used where it is required, being cut to length as necessary.
Top tips
As with any project, there are a few hints, tips and guidelines that will help to prevent any issues arising and ensure that the process is successful every time.
Select wires with different colours: Make sure that two wires are different colours. As the wires are twisted together, if they are the same, it will be very difficult to work out which is which at the far end without measuring for continuity.
Cut the wire longer than the basic requirement: It is important to cut the wire a bit longer than the exact requirement. In this way it is possible to accommodate the wire for each end, the slight reduction in cable length as the wires are twisted together, and finally it is very easy to underestimate the length needed, so it is better to cut it slightly longer than too short.
Keep the wire under tension when it is being wound: It is important to keep tension on the wires as they are being twisted together. This will help ensure a smooth twisting action, and also it will prevent the wire kinking and knotting as it is wound.
This method of making a twisted wire pair is simple, quick and it gives a very neat and presentable result. Using twisted pair wires can help reduce the level of interference picked up on wires, although when high levels of isolation are required, coaxial cable is more reliable.
 Written by Ian Poole .
Experienced electronics engineer and author.
More Construction Ideas & Concepts:
Soldering
SMT component soldering
ESD - Electro-Static Discharge
PCB manufacture
PCB assembly
Return to Constructional Techniques menu . . .