How to Solder: manual soldering
Soldering is a key skill for all aspects of electronics construction from making leads to constructing printed circuit boards for both commercial operations and students or hobbyists.
Home » Construction & manufacture » this page
Soldering Tutorial Includes:
Soldering basics
Manual soldering: how to solder
Soldering irons
Tools for soldering
Solder - what it is and how to use it
De-soldering - the secrets of how to do it properly
Solder joints
PCB solder resist
See also: SMT soldering techniques for PCB assembly
Soldering is a skill that is essential for anyone interested in the construction of electronics projects and electronic circuits. Not only will a knowledge of how to solder and general soldering techniques enable reliable solder joints to be made, but the finished electronic project will look much better, and it will be possible to take pride in the overall job.
Although soldering has been the method of connecting wire components for very many years, it is still the method that is used as the standard way of making connections in electronics equipment. Soldering is very simple in its conception, but despite this it is still very effective and can make good reliable electrical joints provided that the soldering has been done well in the first instance.
Areas and tools for soldering
Before any soldering is started, it is necessary to make sure that everything is set. The right tools and the right area is needed before any soldering is started.
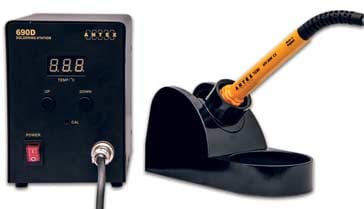
- Tools: Obviously the first requirement is for a good soldering iron. Additionally a small pair of pliers, possible a pair of small round nosed pliers, a pair of small wire cutters and a few other tools may be needed. The actual size of the tools will depend upon the actual nature of the work envisaged, but for most projects these days, with components becoming smaller, the tools should not be too large.
- Work area: In order to make the most of the tools a suitable work area is needed. This should be well light, possibly using an angle light to be able to focus sufficient light on the subject, and it should also be well ventilated to ensure that any fumes from the solder flux, etc can be removed. It is often a good idea to have a small fan running to remove these solder flux fumes.
- Anti-static protection: It is widely recognised today that static can cause problems, especially to integrated circuits and other semiconductor devices. As a result of this it is wise to work in an antistatic area with an antistatic soldering iron. Antistatic mats are available to overcome this.
Soldering preparation
When soldering, cleanliness is particularly important. Dirt and grease on the component connections, or one the wires, or printed circuit board to be soldered will prevent the solder sunning easily and may prevent a good soldered joint being made. Oxide layers also prevent the solder "taking" or wetting properly.
There are a few key steps to make sure the solder takes the surfaces to be soldered:
- Makes sure surfaces are clean: The first stage in preparation for any soldering is to make sure that everything is clean. Make sure that any printed circuit boards are clean and that the copper surface is not contaminated. It often helps to wipe the surface over with a solvent to remove any dirt before soldering. Once this has been done, be sure not to touch any surfaces to be soldered!
- Remove surface oxidation: The wire leads to conventional components oxidise with time. It can help to scrape off any oxide. This can easily be accomplished by gripping the lead lightly with a pair of pliers and gently pulling the component so that the surface rubs against the pliers and the oxide layer is removed. This needs to be done with care so that the component is not damaged.
- Clean connector bodies: Similarly where the bodies of some connectors need to be soldered, it is often necessary to remove and wax or other surface oxide or contaminant. It sometimes helps just to scrape the surface. Sometimes the chrome plating used on many low cost audio and other connectors can be difficult to wet with solder. A little slight roughening of the surface helps.
- Clean the soldering iron bit: It is also important that the soldering iron is clean. The bits on the soldering iron soon get dirty with spent flux residue, and this needs to be removed. Most soldering iron stands come with a place for a wet sponge. The soldering iron bit should be wiped over this regularly when in use to ensure that it is clean.
Tin before soldering
It is necessary to ensure that the solder flows easily on both the iron and the joint. This process which is often called tinning, is an essential element in making a good soldered joint. Once tinned the solder will flow more easily.
- Tin the soldering iron bit: It is first necessary to ensure that the soldering iron bit is properly tinned or wetted. Apply a small amount of solder to the soldering iron bit shortly before making the joint. Ensure that it flows smoothly over the surface of the soldering iron bit. If not wipe it on the wet sponge, normally included in the soldering iron holder and repeat the process until a thin layer of solder is present on the soldering iron bit. However do not have too much solder on the soldering iron bit, as this will lead to poor joints. The solder on the iron bit will oxidise and large amounts of this solder will result in dry joints.
- Tin wires / areas to be soldered: When the soldered joint is ultimately made it is necessary that the solder flows easily and evenly over it. This occurs best of the wires to be joined have a thin layer of solder on them, i.e. they have been tinned. Most component leads are already tinned, but some connectors, or other components may not be. Accordingly it is best to tin them before making the final soldered joint.
To tin a component ready for soldering, apply the soldering iron and solder to the area of the component lead that needs tinning. Melt a small amount of solder onto it and run the iron up and down the area to be tinned. Only use enough solder for this to leave a thin layer of solder on the component lead. Remove any excess as this is not required.
With all the components suitably tinned, and all the components available and prepared, the job of soldering can begin.
Making the soldered joints
Making a soldered joint is quite simple, and with a little practice it will be possible to make very good soldered joints.
- Place the components / wires to be soldered: The first step is to ensure that the components can either be moved into place easily, or they are already in place. This may involve placing the leads through holes in a printed circuit board, or securing them round a post. However do not fix them too firmly, otherwise removal at a later late will be very difficult, should this be needed.
- Clean the soldering iron bit: Next clean the bit of the soldering iron on the sponge and ensure there is a little solder on the bit - you may need to melt a small extra amount to make sure the bit is tinned. This also helps heat flow from the iron to the joint. Take the iron to the joint and apply the iron to the joint at the same time as the solder. Melt just enough solder onto the joint.
- Solder the joint: Apply the soldering iron and the solder to the joint simultaneously. Allow the solder to flow across it and for the flux to work. Allow enough solder onto the joint to make a good joint, but not excessive amounts - there should be no blobs of solder around! Making the solder joint should take no more than a couple of seconds. If the iron is held on the joint too long then the solder will oxidise and this will result in a dry joint.
- Remove the iron and wait: Once the joint has been made, remove the soldering iron and the solder, and allow the joint to cool. Remember, though that it will remain hot to touch for some time.
Inspect the soldered joints
It is necessary to ensure that once the solder joint has been made that it is satisfactory. This is best done by visually inspecting it.
- Check for sufficient solder: Solder joints should have sufficient solder but not too much. For printed circuit board or PCB solder joint, the solder should completely envelope or "wet" the component and the surrounding area of the board and it should have a concave meniscus. It should not be overloaded with solder such that the solder is convex.
- Check for dry joints: The joint should look quite shiny. If it has a dry grainy look to it, this is what is termed a dry joint. It results from the soldering iron being applied to the joint for too long, or the joint having been moved while it is cooling. It is not advisable to simply apply more solder. The best course of action is to remove the solder and start again.
Golden rules for soldering
There are a number of hints, tips and golden rules when soldering.
- Safety First: When undertaking any soldering it is necessary to put safety at the top of the list. Soldering irons are very hot and can cause burns. The best course of action is to have a great awareness of safety. However there are a few golden rules as a start. First, always use a soldering iron holder for when the soldering iron is not in use. When in use, be careful where it goes. If someone else is around, they could easily be burned. Also never use one when small children are around.
- Keep the soldering iron bit clean: As the soldering iron bit remains hot whilst it is in use, it quickly becomes dirty. Frequent cleaning on a wet sponge is needed.
- Apply solder and soldering iron simultaneously: One of the keys to good soldering is applying the soldering iron and the solder to the joint at the same time. Don’t put solder onto the bit and then carry it to the joint.
- Don’t use too much solder: It is often tempting to use a bit extra solder, but use just enough to make a good joint. PCB joints should be slightly concave and other joints should have enough to ensure a good joint.
- Don’t keep the iron in place too long: Once a joint has been made, remove the iron and let the joint and other areas cool.
Additionally with the advent of lead free solder, this should be used if possible. This new solder is now available in the electronics construction shops. Although slightly different to the traditional tin lead solder, it reduces the amount of lead being used.
Learning how to solder well is an essential skill required by anyone building any electronics circuits. For anyone interested in electronics construction, it is essential to ensure that good solder joints are made all the time. Not only will they look better, but they will also result in the circuit working better and more reliably. Dry joints lead to problems, whereas a well constructed and soldered circuit will have a much better chance of working reliably.
 Written by Ian Poole .
Experienced electronics engineer and author.
More Construction Ideas & Concepts:
Soldering
SMT component soldering
ESD - Electro-Static Discharge
PCB manufacture
PCB assembly
Return to Constructional Techniques menu . . .