How to Make Videos & Vlogs
When making videos and Vlogs, the quality of the sound and video is important so we have put together some top tips to help with video making and vlogging.
Vlogging & Video Making includes:
Basic Guide to Vlogging & Video Making
Making short videos for platforms such as YouTube is becoming far more commonplace. They can be used for vlogging, teaching, instructing, and generally communicating for a host of reasons.
These videos can be very easy to make, and they are often very effective. However it helps to understand a few of the basic general video making tips to ensure that the best video content is created. Having a basic understanding of how to make a video can be a considerable bonus.
Whilst there are generally no hard and fast rules, understanding some of the basics of making videos and vlogs can ensure that the content is as engaging as possible.
Fortunately, the guidelines are easy, and we've also added a few helpful hints and tips as well as a few shortcuts that can help with making the videos and vlogs, on a remarkably small budget.
Basic concepts
Modern video equipment is very good. Not only can cameras of many forms be used: everything from compact cameras to DSLRs produce very good quality video, so too can many smartphones. Their technology is improving all the time.
This means that whatever you have, it is likely to work well, with a little thought about how to make the video.
Two of the key elements for any video making or Vlogging are sound and lighting. If these two are reasonably good, then the rest is likely to be OK.
With a few ideas about how to better capture the sound and light the subject, then the quality of the video can be considerably enhanced and look far more professional. If it looks more professional, then people will take a much more notice of it.
Cameras for video and vlogging
Today there are very many ways of capturing video - many years ago it required a specialised film camera, and then after this special camcorders and other digital cameras became available. Nowadays a host of different types of camera are available for capturing video and most is very high quality.
Specialised video cameras: The large video cameras used for broadcast video capture are obviously very good, but also very expensive, and for most applications, their extremely high quality is not required, especially for small video and vlogging applications. There is no need to the spend huge amounts of money some of these cameras.
DSLR and other 'still' cameras: DSLR and many other forms of what would normally be considered 'still' cameras have a video capability. These can be put to very good use and provide an excellent and very cost effective form of video camera capable of providing high quality video.
Camcorders: Camcorders were the mainstay of home and semi-professional video cameras for many years. They still provide an excellent way of capturing video, and they are more focussed on providing video than still images.
Smartphones : The cameras in smartphones and tablets have improved enormously in recent years and they are capable of providing good high quality video. The video they provide can be such that it is difficult to tell it apart from that captured with high quality cameras if it is taken in good conditions and no special requirements are needed.
If videoing one's self it can help to have a screen that can be seen. Many cameras have screens that can be moved and folded around so that anyone being videoed can see themselves. This can be a considerable help. Also remote controls are available, especially with some camcorders and these too can be very convenient.
Audio for video making
The audio for video making is of great importance. A few simple additions can make all the world of difference to the overall video. If the sound is poor, then even if the video side is excellent, the overall impression will be significantly degraded.
One of the main elements that lets down the video is that the microphone on the camera is used. Normally these microphones have a poor frequency response, and sound rather 'tinny.' To overcome this an external microphone can considerably improve the performance.
There are a number of options for this:
Handheld microphone: Handheld microphones have been around for many years, and there are several different types that can be used. Possibly the most common type is a dynamic microphone.
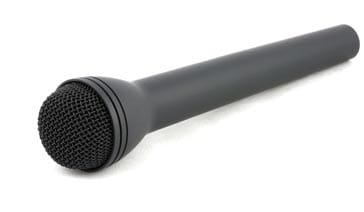
Handheld dynamic microphone These microphones are possibly not the most widely used for general video making and vlogging applications, although they can work well in some applications.
Lavalier or lapel microphone: The lavalier microphone is often used when it is necessary to capture the voice of an individual. They are generally clipped to the collar or buttoning on a shirt, etc, and any wire can be neatly routed out of sight.
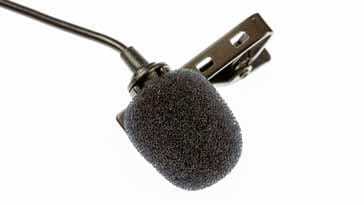
Lapel or lavalier microphone Generally they can be clipped to the person speaking, just above heart height, and often pointed downwards (you will see this if you look carefully at people on TV using them) so they don't capture any of the plosive sounds like 'P', 'T' etc that can give a pop on the microphone, although this effect is much less marked because of the position of the microphone.
These microphones can give a slightly more bassy sound as a result of where they are mounted. Also be careful that they do not get covered by other clothing as this can result in scratchy noises as the clothing passes over the microphone. Wireless ones are more expensive, and if wired ones can be used, then this is the option to go for.
Both wired and wireless lavalier microphones can be bought.
Shotgun microphone: Shotgun microphones are the long microphones that are often seen on the top of cameras. These have a directional response pattern and as a result they tend to cut out extraneous sound.
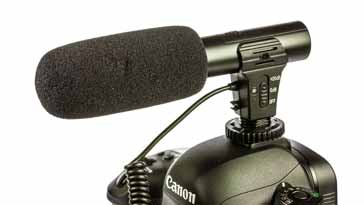
A shotgun microphone on a camera Shotgun microphones are ideal for use when the subject for the video is a little distance away from the camera and other forms of microphone are not available. They also work well for vlogging applications where the vlogger is in front of the camera and does not want to use a lavalier microphone.
An external microphone does not need to be too expensive to provide a significant improvement in quality over the internal microphones on DSLRs, camcorders and smartphones. Some vloggers and video makers manage to use relatively low cost microphones to see a significant improvement in audio quality. Check the reviews and recommendations to see what are the best buys - even wired lavalier microphones for $20 or so and shotgun microphones fo $25 can give good improvements, although they will not be as good as top quality microphones from named manufacturers, but it is worth examining what is needed.
It is worth noting a few hints and tips to get better sound on the video.
Remove boxy sound in rooms: Videos are often shot in rooms and therefore they can sound rather 'boxy.' It occurs as a result of the echoes from the hard surfaces in the room. There are a number of ways of reducing this:
Reduce the level of hard surfaces in the room: Although it is unlikely that it will be possible to totally change the room, even small things like closing the curtains can help, although this may affect the lighting requirements. It may also be possibly to select a room with fewer hard surfaces.
Speak closer to the microphone: If the distance from the speaker to the microphone is reduced, then the direct voice will be much louder,, and the echoes will remain at the same level, but the ratio will be increased so that the effect of the echo is much less obvious. The use of a lavalier microphone may help.
Use a directional microphone: Directional microphones like shotgun microphones will reduce the effect of the echo as a result of its directional properties.
Reduce wind noise: When videoing outside, wind noise can reduce the overall quality of the recording. One solution is to make sure that any recoding is done on a windless day, but in addition to this one of the fluffy socks seen on microphones on the television can be used. These can be bought relatively cheaply with many shotgun microphones etc. They are simply placed over the microphone when videoing outside.
Ensure the microphone is compatible with the camera: The requirements for microphones are different between DSLRs, camcorders, etc and smartphones. When buying a microphone for use with a camera or smartphone, check that it is compatible wit the type of camera you are using. Some microphones may have a switch that enables them to be used on both types.
Lighting for video making & vlogging
The other main requirement for a successful video is that it has good lighting. Whilst today's cameras and smartphones have improved considerably in recent years and can accommodate a wide range of light conditions, it is always best to get the lighting right. Getting the lighting right will ensure that the faces are sufficiently well light, that backgrounds don't get "blown out' because they are too bright, and that the subject stands out nicely.
Having sufficient lighting will bring the video alive, whereas dull lighting will tend to make the video just that, and people may loose interest kore easily. So it pays to keep good lighting on the subject.
There are a few hints and tips to help with the lighting on videos.
Don't have a window behind you: Much video is taken indoors and this point is one of the key points to remember. Having a window behind the subject will result in the detail in the window being 'blown out', i.e. white and the subject being very dark. This will give poor results on the video. If it is necessary to have the window behind the subject, pull the curtains.
Have lighting from the front : It is always good to have the front of the subject light. If videoing indoors, have the window in front of the subject, or outside, make sure the sun is shining on their face (but not blinding them). Often an overcast day gives a softer light that can be kinder to people, whereas sunlight gives harsh shadows, but it does give a warmer look to the video.
If needed have some additional lighting at about 30°: When shooting indoors, it can be helpful to have some additional light on the subject, or when shooting outdoors a light can help to fill in the harsh shadows.
The light should ideally be about 30° offset from the camera. Light from the direction of the camera can give a harsh light that flattens the picture and removes detail. Think about the onboard flash on a camera and how that lights the subject. LED lights for video can be bought relatively cheaply and easily mounted on a cheap tripod.

LED light of the type that can be used for lighting video subjects Often small additional lights may have a hot shoe attachment, i.e. the sort used for flash guns, so they can be mounted directly on the camera. Offsetting them slightly gives a more natural light, which does not flatten the detail of the subject. Ideally the light should be on the same level or slightly above the subject. An additional tripod can be used for this.
Keep the lighting daylight compatible: On many LED light bulbs as well as photographic lighting a colour temperature is given. Some lights give a daylight quality similar to that experienced in the middle of the day, whereas others give a much warmer light. The standard for noon daylight is 5600°K. If several light sources are used, then try to match this approximately, otherwise the lighting will look rather odd. Often light bulbs that give an emulation of daylight have a colour temperature of 6500°K and this is fine. Warm white tends to be around 3000°K and if mixed with daylight bulbs it can give an unusual mix.
Keep the camera steady
Although modern cameras and smartphones have really good levels of image stabilisation, it really helps that shots where the camera needs to stay still are held properly.
There are many ways of holding a camera steady.
Standard tripod: Tripods are ideal for holding camcorders and cameras. Some are heavy and others are much lighter. Often for basic video they may not need to be quite as heavy as those needed for stills because any camera shake will not be quite as noticeable. Although for high quality video a good robust tripod is ideal.
If wanting to hold a smartphone on a tripod, it is possible to get attachments that enable them to screw onto the fixing normally used for the camera or camcorder. These are relatively low cost items and can be found on internet sites like Amazon. Search for something like 'Smartphone Tripod Attachment.'
Mini tripod: Whilst large tripods can be ideal in many situations, a much cheaper option can be to have a mini-tripod. These may be ideal for standing on a table, sideboard or other surface. Some even have bendable legs enabling them to stand on a variety of different surfaces. However, beware, these mini-tripods are generally only suitable for small cameras and smartphones - some come with a smartphone attachment rather than the standard camera screw attachment.
Gimbal: A gimbal can be a fun gadget to have when videoing. They come in a variety of sizes: professional ones for DSLRs of large professional cameras are very expensive, but much smaller ones are available for use with smartphones. Although not cheap, they are far less costly than the large professional items. They enable a very smooth level of movement to be achieved and they provide a good way of holding the smartphone, rather than having to hold it with two hands and try to keep it steady.
Make your own smartphone holder: When videoing with a smartphone, it is possible to improvise a very neat holder using an old plastic or paper cup.

How to make a smartphone holder out of paper cup To make the cup holder for the smartphone, simply invert the cup and cut a smartphone sized slit in what was the bottom. The slit should be sufficiently deep to hold the smartphone, possibly about half way down the smartphone itself. This is cheap and can sometimes enable a sufficiently firm stand to be made when nothing else is available.
Extra hints and tips
There are a few extra hints and tips about taking video for general video making and vlogging:
Take video in landscape: it is best to take video in landscape format, i.e. the longest part of the picture in the horizontal plane. Taking it in portrait format, with the longest side of the picture in the vertical plane means that there will be black space on either side of the video. All televisions and the like display in landscape format, so it is always best to match this.
Where the person speaking should look: It is important to know where to look when talking on camera. Having the right angle to the camera will say a lot to the viewer. In general if you are talking directly to the viewer, then look directly at the camera. Vlogging, as well as some instructional videos where the person on-camera is talking directly to the viewer should look at it. When running a series of interviews with different people, it helps to have them not all looking the same way. This approach is often used for documentaries and news items where an interviewer is asking questions.
If someone is being interviewed, then they should look about 15 to 20° off to one side
Compose the picture: The way the picture is composed can have a great impact on the video.
Don't have a background that is too busy: The background can add significantly to a video or video clip. It is wise not to have something that is too busy, or is animated as this can detract from the video.
It can often help to have a background that links in with the topic, e.g. a laboratory if the topic is about technical things, hospital background for medical topics, etc . .
Sometimes a bookcase can look good, especially if it is tidy. A plain background can look a bit uninteresting. If so, a plant or other suitable object on a shelf behind can keep the background simple but really elegant.
Rule of thirds: One of the classic rules for photography is the rule of thirds. Imagine the screen split into thirds horizontally and vertically. It helps compose the overall image better if the subject is off-centre on one of the third lines.
The same practice can be used with video making and vlogging. Obviously if someone is talking directly at the camera to the viewer, then they should be placed in the centre, but someone is talking across the camera, bing interviewed, then they should be placed approximately on one of the third lines, talking into the picture, i.e. space in front of their face and not behind it. This is not a hard and fast rule, but one that helps in many situations.
Pan slowly: Sometimes it will be necessary to pan the camera to obtain an image that covers different areas. When panning the camera some cameras may give a very jerky image. This can be as a result of the image stabilisation. If the camera uses software to stabilise the image, it will look for a pattern or area of the image and try to keep it in a particular position, believing that any movement needs to be counteracted. Only when it has moved sufficiently will the software let go and allow the image to move to a new position. The process is repeated so that the image jerks as it moves. Slowing down the rate of panning can eliminate it. Alternatively the image stabilisation can be turned off. Unfortunately it is not possible to achieve this on all cameras, and especially smartphones which provide limited control over the functions.
Keep the camera at face level: For most video situations, it is best to keep the video camera at eye level. Most tripods have some height adjustment, and other camera mountings can be placed on surface that enable this to be achieved. Looking up to the camera can look natural of someone is obviously seated in a chair, but looking down onto the camera does not work well - it can subconsciously imply superiority, and this is generally not what is needed. Having the camera at eye level normally is the best situation.
Making videos for general video applications and for vlogging can be great fun. Also with many more people using short videos for teaching, for short interviews and for generally communicating, it helps to have a few basic skills so that better videos can be made.
Following a few simple guidelines can help the video to look far more professional and to be far more engaging. Lighting and audio are the two main technical issues, but in terms of the interest for the video, a good 'story' and lively happy faces help make the content much more interesting.
 Written by Ian Poole .
Experienced electronics engineer and author.
More Audio Video Topics:
HDMI
SCART
DisplayPort
DVI
Loudspeaker technology
Headphones & earphones
Bluetooth speakers
Stereo sound
Microphones
Audio compact cassettes
Vinyl record technology
Digital radio
DVB television
Return to Audio / Video menu . . .