How to Use & Set up Morse Key
Having a Morse code straight key set up correctly and using it in the best way can make sending Morse easier, more pleasurable and ensure that the Morse code that is sent is well spaced and easy to read.
Morse Code includes:
What is Morse code
How to learn Morse code
Morse code table / chart
Morse code keys & keyers
How to choose the right Morse Key
How to use & set-up straight Morse key
How to use & set-up mechanical bug key
CW QSO
Morse code products & reviews
Morse products
Morse Code Keys: A Comprehensive Buyer’s Guide
Using and setting up a Morse code straight key may not be quite as easy as it sounds. Selecting the best position, ensuring that the operating position is right can make sending code much easier, and then setting the key itself up can be interesting as there are a host of different adjustments to be made.
Following a few simple guidelines that have been learned over the years can ensure that using the Morse code can be as easy and pleasurable as possible: it can help ensure that the code that is sent is as understandable as possible, and also that the strain of sending is reduced.
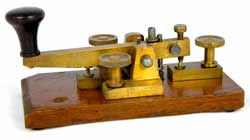
Positioning the Morse code straight key
The position of the Morse key on the operating table is very important as this has a significant effect on the way in which the Morse is sent and the ease of sending.
Dependent upon the type of key, the optimum positioning will vary.
European style key with large lever: The European style Morse code key is typified by the solid looking construction, and in particular the lever. It also tends to have a larger handling knob which is often around 50 to 60mm above the table surface.
For these keys, it is best to have them located near the edge of the table as intended for this design. In this way the forearm should be almost horizontal and unsupported whilst using the Morse key.
If this type of key is used further back on the table, with the forearm on the table, it will mean the wrist is bent upwards which is most uncomfortable.
American style steel lever key : The American style of Morse key is typified by much oval shaped base and the thin lever and it has a handling knob that is often around 20mm above the table surface.
This type of Morse key is better located much further in on the table so that the forearm and wrist rest on the table - this type of position can be much less tiring for long periods of operation.
How to hold the Morse key for sending
The way in which the Morse knob is held also has an impact on the sending. It should not be tapped on the top as seen in many movies, instead it should be gripped properly.
The standard way of holding the knob on the Morse key, is for the thumb to be placed on one side, the tip of the first finger to be on the top, and the tip of the second finger to be around the other side to the thumb.
Obviously the exact positions will depend upon the shape of the Morse key knob, and also whether it has a skirt at the bottom.
It is also important that whilst the key should be held firmly, this grip should be relaxed and not tense. The firmness should just be such that the hold on the key does not slip whilst sending.
Adjusting the Morse key
There are several adjustments that can be made to the mechanical settings on the Morse code key. These can be set in a number of ways and the actual adjustments will depend upon the speed of the code being sent and a variety of other aspects.
There is no one way in which they must be set, but instead, they should be adjusted for what works for you and the way you are sending, although some guidelines help get the right settings.
Video: How to Set-Up & Use a Straight Morse Key
All Morse keys have a number of lockable adjustments that can be made. It is worth noting, though, that not all keys have all the adjusters that some have.
The main adjusters include the following:
Tension spring: This adjuster sets the force needed on the Morse key lever to make the contact and it ensures that the key remains in the 'open' condition when no pressure is applied. There is normally a spring under the main lever that provides the force to keep the key open.
Bearing tension: This adjustment is applicable to the America steel lever type of Morse key.There are normally two bearing adjusters, one on either side of the key.
Contact spacing: There is normally an adjuster above the contact, between the pivot / bearing and the knob of the key. This is used to adjust the spacing between the contact. Slacken it off and the spacing increases requiring a larger movement, or tighten it up to make a smaller spacing requiring less movement. On some morse keys there may be no adjuster above the contact and instead, what may be termed the second contact adjuster must be used.
Second contact adjuster: Sometimes the is a second adjuster at the far end of the lever. Adjustment of this also gives an adjustment of the spacing.
Procedure for adjusting a Straight Morse key
Slacken off adjusters: It is often advisable to slacken off the adjusters on the Morse key a little to give a common starting point.
Adjust bearing tension: This Morse key adjustment is only applicable to the American steel lever type of key. The adjusters on either side of the key should be slowly tightened, adjusting first one and then the other so that the lever remains central, especially that the contacts are able one another. Repeat this so until the lever ceases to wobble and have free side to side movement, but it also moves very freely. Don't over-tighten as it can damage the bearing surfaces between the adjusters and the lever itself.
Contact spacing: Normally there is only one adjuster for the contact spacing. If so, this should be adjusted to give the required spacing. Often this should be between 1.5 and 2 mm, although as experience is gained and speeds increase, it might be preferable to reduce this.
Where two adjusters are present, the second adjuster at the end of the lever can be adjusted so that the lever is reasonably level when the Morse code key is in its 'rest' position. The main adjuster can then be adjusted to give the required gap.
Arm tension: The adjustment of the arm tension should be such that it ensures that a positive action is maintained. As experience is gained, the tension may be slackened, but it should never be reduced to the point where unwanted contact is made and spurious or unwanted dots or dashes appear.
These stages provide the basic steps for adjusting a Morse straight key, and tailoring its 'feel' according to what is needed.
How to send Morse code
It is very important when setting out to send Morse code that good practices are used and that the Morse code that is sent is as good as it can be.
Making sure that good code is sent is very important - good habits that start when learning to send Morse code will provide a good foundation. Bad habits may be difficult to change later.
 Written by Ian Poole .
Experienced electronics engineer and author.
More Ham Radio Topics:
What is ham radio
Callsigns
Morse code
Voice modes
Digital data modes
QRP operating
Operating awards
Codes & abbreviations
Ham bands overview
Operating via differnet propagation modes
Repeaters
Callsigns
Contact formats
Setting up a shack & buying equipment
Return to Ham radio menu . . .