
Renovation of a Loudspeaker System & Box
Details of how an old loudspeaker system and box were renovated, improved to give ideas for how this can be done.
Loudspeaker Tutorial Includes:
What is a loudspeaker: basics
Moving coil loudspeaker
Loudspeaker enclosures
Loudspeaker repairs
Speaker wire / cable
Additional baffle topics:
Speaker Open Baffle
Infinite Baffle Speaker Cabinet
How to make a loudspeaker box
Upgrading old speaker system
There are many loudspeaker systems that must be hidden away in attic or other species. These old loudspeaker systems could be brought up to date and improved to provide a much better sound than they originally did.
A little work and expenditure can enable the loudspeaker system to be improved by changing and upgrading the loudspeaker units themselves as well as adding improvements to the cabinet or box.
This page details the upgrades made to a system over a number of years and how the sound they produce now is much better than the original speakers.
Rather than being a definitive set of instructions, this is more a story of how the speakers were improved and it is hoped that this will give ideas to others on what can be done.
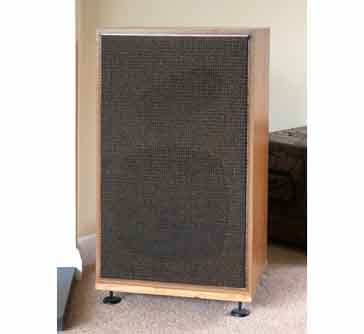
The original system
The original loudspeakers were a pair of Goodman's Magnum SL loudspeakers bought around 1973. At the time they were meant to be a good hi-fi loudspeaker system, and they cost a reasonable amount.
The basic Goodman's Magnum SL was a three loudspeaker system consisting of a 12 inch bass unit, a mid range unit and a top range unit.
Very few details were provided with the Goodman's Magnum SL speakers and comparatively little data could be found on the Internet. However it was possible to piece together some specifications and general technical details for the system.
| Performance Specifications for the Goodman's Magnum SL Loudspeakers |
||
|---|---|---|
| Parameter | Specification | Source of Information |
| Frequency response | 35Hz - 20kHz | Instruction sheet provided with speakers |
| Nominal power | 60 Watts | Label on rear of speakers |
| RMS power | 50 Watts | Label on rear of speakers |
| Impedance | 8Ω | Label on rear of speakers |
| Sensitivity | 2 Watts | Label on rear of speakers |
| Crossover frequencies | 2kHz & 6kHz | Internet |
Even this data could be a little vague as items like the frequency response did not give the actual response limits for the frequency range, and the sensitivity did not appear to give any other data to define the specification.
Video: Loudspeaker Repair & Upgrade Project
Whilst the performance was quite good, the bass response did not seem to match that which wold be expected from speakers of this size - other people seemed to concur with this appraisal of them when they posted notes about these speakers.
A further issue occurred some years after the purchase of these Magnum SL speakers when the cone for the midrange unit came away from the chassis. Apparently they used a water based glue for this which with time and normal home moisture levels and this eventually came unstuck. This caused a nasty rasping noise as the cone became off-centre and the coil rubbed against the magnet. The first time this happened, replacement units could be bought, but when the next one failed, all manufacture and repair had long since ceased.
The demise of the mid-range unit within the Goodman's speakers forced a decision to be made about either keeping them and repairing them, or buying a new set of loudspeakers. As they had been a present, and quite good in their time, it was decided to have a go and repair them.
Stage 1 of the repair and upgrade
The first stage of the repair of the Magnum SL loudspeakers was to find a way of repairing or replacing the mid range speaker unit. With comparatively little knowledge about the best way of achieving a repair, a UK based audio and loudspeaker retailer and kit manufacturer named Wilmslow Audio was contacted.
There are many different loudspeaker drive units to choose from: Scanspeak, Morel, Volt, Vifa, Fostex, Monacor, Peerless and more, there is a very good selection for which to choose.
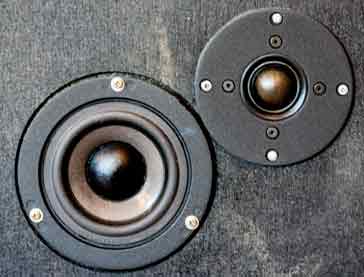
They suggested replacing the mid range and top units with new drive units from Scanspeak. It was suggested these would give a significant improvement in the overall performance of the loudspeaker system.
The two drive units selected fitted the existing holes exactly and the replacement was very easy. In any system being upgraded the wide selection of drive units available from different manufacturers means that virtually exact replacements can be selected. Matching the performance also needs to be a major consideration.
Further enhancements that were suggested were to replace the capacitors in the crossover network. As they were 30years old they would benefit from being replaced. It was also suggested that a gasket sealing strip was used around all the openings to ensure a good seal.
These additional items were added and the updates implemented. The upgrades significantly improved the performance of the speakers, although it was noticed that the bass response was not as good as it might be for a speaker system of its size, especially as it used a 12 inch woofer.
Stage 2 of the repair and upgrade
The speakers were used like this for some while, although the bass level on the amplifier was turned up a little to compensate. However the lack of really deep bass meant that some music was still not reproduced as well as it could be.
Further investigations looked at other improvements that could be made.
It seemed that there were two main avenues for improvement:
Replace the bass drive unit: The original loudspeakers in the system were over 40 years old. Speaker technology has moved on significantly since this one was designed and manufactured, so it seems likely that replacing the bass drive unit could give some significant improvements. As no specifications could be found for the loudspeaker, and indeed, no part number was available on the loudspeaker drive unit itself, comparisons were difficult to make. One catalogue sheet for some Goodman's loudspeaker drive units was found, and although these were intended probably for guitar amps, etc, the resonate frequencies were around 80Hz or so.
Looking through the various physical data sheets of the different manufacturers exact physical replacements for the speakers were difficult to find. Scanspeak, Morel, Fostex, Monacor, Peerless and others were all checked and none gave a drop in replacement. This required additional work to be done to the cabinet and this work was put on hold until the other improvements had been made.
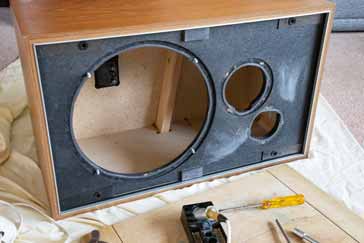
Improve the loudspeaker box / cabinet: It was felt the loudspeaker box could be considerably improved. It was made from 20mm chipboard rather than a thicker 25mm material, and there was little bracing inside. The bracing consisted of one member placed about half way down the back between the two sides. Also the only sound absorbent material was two sections of foam rubber, one behind the two higher frequency drive units and one behind the woofer.
Also the chipboard used was somewhat more "lively" and and not as thick and rigid as it might be. This meant that the box tended to vibrate more than if other substances had been used. Even at reasonable volumes, when the sides and back of the case or cabinet were touched, it was possible to feel the vibrations. In fact the bass appeared to be better behind the speakers than in front. Reducing the vibrations on the cabinet would improve the bass response at the front.
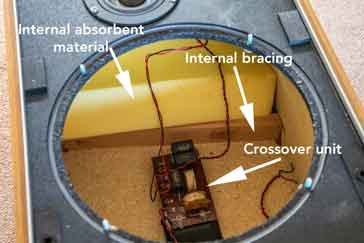
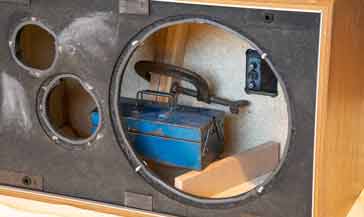
The internals of the Goodman's Magnum SL showing the bass unit removed to reveal the original sound absorbent material behind the top frequency drive units, and the small amount of original bracing These vibrations from the panels would be in anti-phase to those from the front and therefore they would tend to cancel each other out at bass frequencies. Higher up in frequency it would lead to dips and peaks in the response as the wavelength reduced with increasing frequency and the signals would cancel and then reinforce each other dependent upon the frequency and a host of other factors.
Adding bracing & sound absorbency to the cabinets
There is a good amount of material on the Internet talking about the need for bracing within loudspeaker cabinets or boxes. Although care is needed in using the right materials and in positioning of the braces, the consensus is that bracing will improve the sound.
The any bracing of the loudspeaker cabinet should be such that it does not resonate itself - the braces should have sufficient strength to reduce the cabinet vibrations and rigidity not to resonate itself.
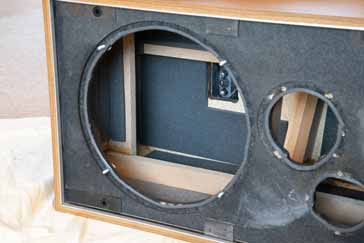
It was chosen to use MDF as this is not as acoustically lively as other materials - selecting a dense version of MDF helps. Also options for using short lengths to dampen the areas of maximum vibration, e.g. back to front braces for the side panels in the case of this cabinet used a shorter length than top to bottom whilst still bracing the middle of the side panel.
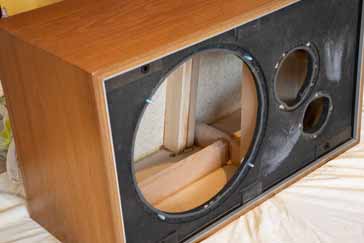
Lengths of MDF 50mm thick were cut, and then trimmed to the length required for the particular brace in question. Once trimmed to the right length they wee glued firmly in place. The actual position of them was governed to some extent by the brace that had already been added during the initial manufacture, and when retro fitting braces, there will be limitations to what can be incorporated. In the case of these loudspeakers it was not possible to take the front or back off to gain better access because all the joins were glued. As a result, all the access had to be gained through the bass speaker cut-out.
Warning: When cutting, sanding and shaping MDF, great care must be taken not to inhale the dust as it can damage health. Wear a mask and cut the board outside and not in an enclosed space.
In view of having to work around what was already there, the inside of the loudspeaker cabinet was not the tidiest, but the aim was to have the greatest rigidity. As the inside of the box was not on show, the looks did not really matter.
Note the clamp on the additional member at the back and the weight on another member (the free brace in the foreground was only being used to balance the weight).
When new braces were added, clamps were used where possible to keep the join between the new brace and the cabinet under compression while the glue dried. Where it was not possible to use a clamp, a weighty item as placed on the new brace to ensure it was held firmly in place.
In addition to the added bracing for the loudspeaker box, special acoustic damping was added to the panels between the braces. These damping sheets are about the size of an A4 sheet of paper, and can easily be cut if needed, thereby allowing the major areas to be covered.
They consist of an adhesive backing, a bitumen based larger to dampen vibrations and a foam top to absorb sound. Fitting them simply required them to be cut to size and then the adhesive backing sheet removed so that they could be firmly stuck to the internal surface of the panel.
Before
After
These improvements detail a story, not necessarily of the absolute best way to implement these changes, but ideas that were implemented to provide a significant improvement in the performance of these old and much loved loudspeakers.
The result has been that the bass response of the speakers is very much better than it was before, whilst the mid and top range are as clear as ever.
The speakers will probably be the basis of further improvements and modifications in the future, and this work adds to their enjoyment as this work has been done at home and I had invested my time and expertise into them.
 Written by Ian Poole .
Experienced electronics engineer and author.
More Audio Video Topics:
HDMI
SCART
DisplayPort
DVI
Loudspeaker technology
Headphones & earphones
Bluetooth speakers
Stereo sound
Microphones
Audio compact cassettes
Vinyl record technology
Digital radio
DVB television
Return to Audio / Video menu . . .
Written by Ian Poole .
Experienced electronics engineer and author.