How to use an oscilloscope
The basics or instructions of how to use an oscilloscope, and using an oscilloscope to measure and fault find electronics circuits.
Oscilloscope Tutorial Includes:
Oscilloscope basics
Oscilloscope types
Specifications
USB vs bench-top scope
How to use an oscilloscope
Scope triggering
Oscilloscope probes
Oscilloscope probe specifications
Scope types includes:
Analogue scope
Analogue storage scope
Digital phosphor scope
Digital scope
USB / PC scope
Mixed Signal Oscilloscope MSO
The oscilloscope is a particularly useful item of test equipment that can be used for testing and fault-finding a variety of electronics circuits from logic circuits through analogue circuits to radio circuits. It is necessary to know how to use an oscilloscope properly to be able to make the best use of it. By knowing the basics of using an oscilloscope it is possible to fault find circuits more effectively and more swiftly as well as gaining a better understanding of how they the circuits work.
Although oscilloscopes are more expensive than some other items of test equipment including multimeters, they are often found in the homes and workshops of electronics enthusiasts. As a result it is important that people are aware of how to use an oscilloscope.

Basic oscilloscope controls
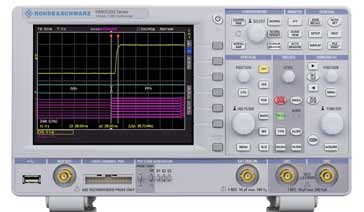
In view of the flexibility and level of control required to use an oscilloscope, there are a large number of controls that are present. These need to be set correctly if the required view of the signal is to be obtained.
Fortunately it is quite easy to get used to operating an oscilloscope and using the controls to be able to view the waveform correctly.
A summary of the main controls on an oscilloscope is given below:
Nevertheless, a short overview of some of the controls is given below:
- Vertical gain: This control on the oscilloscope alters the gain of the amplifier that controls the size of the signal in the vertical axis. It is generally calibrated in terms of a certain number of volts per centimetre. Therefore by setting the vertical gain switch so that a lower number of volts per centimetre is selected, then the vertical gain is increased and the amplitude of the visible waveform on the screen is increased.
When using the oscilloscope, the vertical gain is normally set so that the waveform fills the vertical plane as best as possible, i.e. as large as possible without going outside the visible or calibrated area. - Vertical position: This control on the oscilloscope governs the position of trace when no signal is present. It is normally set to a convenient line on the graticule so that measurements above and below the "zero" position can be measured easily. It also has an equivalent horizontal position control that sets the horizontal position. Again this one should be set to a convenient position for making any timing measurements.
- Timebase: The timebase control sets the speed at which the screen is scanned. It is calibrated in terms of a certain a certain time for each centimetre calibration on the screen. From this the period of a waveform can be calculated. This if a full cycle of a waveform too 10 microseconds to complete, this means that its period is 10 microseconds, and the frequency is the reciprocal of the time period, i.e. 1 / 10 microseconds = 100 kHz.
Normally the timebase is adjusted so that the waveform or a particular point on the waveform under investigation can be seen at its best. - Trigger: The trigger control on the oscilloscope sets the point at which the scan on the waveform starts. On analogue oscilloscopes, only when a certain voltage level had been reached by the waveform would the scan start. This would enable the scan on the waveform to start at the same time on each cycle, enabling a steady waveform to be displayed. By altering the trigger voltage, the scan can be made to start at a different point on the waveform. It is also possible to choose whether to trigger the oscilloscope on a positive, or a negative going part of the waveform. This may be provided by a separate switch marked with + and - signs.
- Trigger hold-off: This is another important control associated with the trigger function. Known as the "hold-off" function it adds a delay to the trigger to prevent it triggering too soon after the completion of the previous scan. This function is sometimes required because there are several points on a waveform on which the oscilloscope can trigger. By adjusting the hold-off function a stable display can be achieved.
- Beam finder: Some oscilloscopes possess a beam finder function. This can be particularly useful as it is possible that sometimes the trace may not be visible. Pressing the beam finder button enables the beam to be found and adjusted so that it is in the centre of the screen.
Although there are many other controls, these are the main ones to understand when learning how to use an oscilloscope. Nevertheless it is very useful to understand the other controls on an oscilloscope, but some will vary from one type to another.
First steps in using an oscilloscope
Using an oscilloscope is quite easy once one has been used and it is possible to become familiar with the use of the controls. The first stage comes when turning on an oscilloscope and this is where knowing a few steps about how to use an oscilloscope can be very useful.
- Turn power on: This may appear obvious but is the first step. Usually the switch will be labelled "Power" or "Line". Once the power is on, it is normal for a power indicator or line indicator light to come on. This shows that power has been applied.
- Wait for oscilloscope display to appear: Although many oscilloscopes these days have semiconductor based displays, many of the older ones still use cathode ray tubes (crts), and these take a short while to warm up before the display appears. Even modern semiconductor ones often need time for their electronics to "boot-up". It is therefore often necessary to wait a minute or so before the oscilloscope can be used.
- Find the trace: Once the oscilloscope is ready it is necessary to find the trace. Often it will be visible, but before any other waveforms can be seen, this is the first stage. Typically the trigger can be set to the centre and the hold-off turned fully counter-clockwise. Also set the horizontal and vertical position controls to the centre, if they are not already there. Usually the trace will become visible. If not the "beamfinder" button can be pressed and this will locate the trace.
- Set the gain control: The next stage is to set the horizontal gain control. This should be set so that the expected trace will nearly fill the vertical screen. If the waveform is expected to be 8 volts peak to peak, and the calibrated section of the screen is 10 centimetres high, then set the gain so that it is 1 volt / centimetre. This way the waveform will occupy 8 centimetres, almost filling the screen.
- Set the timebase speed: It is also necessary to set the timebase speed on the oscilloscope. The actual setting will depend on what needs to be seen. Typically if a waveform has a period of 10 ms and the screen has a width of 12 centimetres, then a timebase speed of 1 ms per centimetre or division would be chosen.
- Apply the signal: With the controls set approximately correctly the signal can be applied and an image should be seen.
- Adjust the trigger: At this stage it is necessary to adjust the trigger level and whether it triggers on the positive or negative going edge. The trigger level control will be able to control where on the waveform the timebase is triggered and hence the trace starts on the waveform. The choice of whether it triggers on the positive or negative going edge may also be important. These should be adjusted to give the required image.
- Adjust the controls for the best image: With a stable waveform in place, the vertical gain and timebase controls can be re-adjusted to give the required image.
Summary
One a few measurements have been made, it becomes much easier knowing how to use an oscilloscope. As oscilloscopes are one of the mainstay pieces of equipment, it is important for anyone involved in electronics to know how to use an oscilloscope and how to make the best use of them.
 Written by Ian Poole .
Experienced electronics engineer and author.
More Test Topics:
Data network analyzer
Digital Multimeter
Frequency counter
Oscilloscope
Signal generators
Spectrum analyzer
LCR meter
Dip meter, GDO
Logic analyzer
RF power meter
RF signal generator
Logic probe
PAT testing & testers
Time domain reflectometer
Vector network analyzer
PXI
GPIB
Boundary scan / JTAG
Data acquisition
Return to Test menu . . .


